필자가 가장 알고 싶어했던 다차로 고속도로 네트워크를 구축하고 시뮬레이션을 수행하는 작업을 진행한다.
3개의 차로로 구성된 고속도로에서 승용차, 트럭, 버스를 구성하며,
같은 승용차에 대해 normal 차량, sporty 차량으로 구분한다.
시뮬레이션을 수행하면서 속도에 따라 색을 주어 gui 시뮬레이션 시 각 차량의 속도를 바로 확인할 수 있도록 시각화 작업도 진행한다.
*SUMO Tutorial을 따라 진행하였으며, 관련 페이지는 아래와 같다.
https://sumo.dlr.de/docs/Tutorials/Autobahn.html
Autobahn - SUMO Documentation
1.1.0 --> Autobahn This tutorial covers the very basic elements for creating heterogeneous flows on a multi-lane highway and modifying and saving view settings. Building a Highway Editing geometry points Open netedit to create a fictional highway. We keep
sumo.dlr.de
1. 네트워크 구축
netedit를 통해 네트워크를 구축한다.
Set move mode를 통해 하나의 도로 선형을 조정할 수 있는데, 아래 그림과 같이 조정할 지점을 클릭하면, 주황색 작은 원이 생기고 이를 조정하면 도로 선형을 조정할 수 있다.

2. 차량 타입 및 교통류 설정
Normal 차량, Sporty 차량은 passenger class를 적용하였으며, 그 외 최대속도와 속도계수 등을 다르게 설정하였다.
Trailer 트럭과 Coach 버스도 각각 아래와 같이 설정하였다.
<routes>
    <vType id="normal_car" vClass="passenger" maxSpeed="40" speedFactor="0.9" speedDev="0.2" sigma="0.5"/>
    <vType id="sporty_car" vClass="passenger" maxSpeed="60" speedFactor="1.3" speedDev="0.1" sigma="0.1"/>
    <vType id="trailer" vClass="trailer"  maxSpeed="30" speedFactor="1" speedDev="0.05"/>
    <vType id="coach" vClass="coach"  maxSpeed="30" speedFactor="1" speedDev="0.05"/>

    <flow id="normal" type="normal_car" begin="0" end="5000" number="5000" from="entry" to="exit" departSpeed="avg" departLane="best"/>
    <flow id="sporty" type="sporty_car" begin="0" end="5000" number="300" from="entry" to="exit" departSpeed="avg" departLane="best"/>
    <flow id="coach" type="coach" begin="0" end="5000" number="300" from="entry" to="exit" departSpeed="avg" departLane="best"/>
    <flow id="trailer" type="trailer" begin="0" end="5000" number="700" from="entry" to="exit" departSpeed="avg" departLane="best"/>
</routes>
3. 시뮬레이션 수행 및 시각화
시뮬레이션은 이전의 포스팅에 언급했던 대로, sumocfg를 통해 진행하며, 앞서 정의한 net, rou 파일을 바탕으로 수행한다.
이번에 수행해볼 것은 시뮬레이션이 돌아가고 있을 때, 속도에 따라 차량에 색을 다르게 표시하여 시뮬레이션을 gui로 수행할 때, 차량들의 속도를 바로 파악할 수 있도록 하는 것이다.
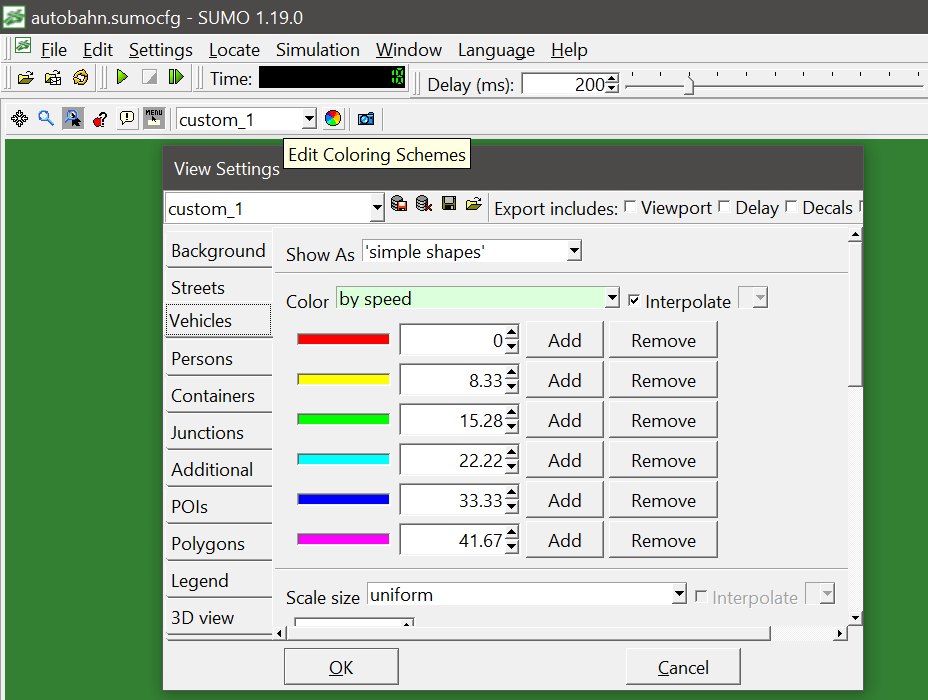
아래 그림과 같이 Edit Coloring Schemes를 클릭하면, 색을 지정할 조건과 대상, 그리고 기준을 설정할 수 있다.
이 Schemes은 따로 파일로 저장하여 시뮬레이션 마다 적용할 수 있다.
아래 이 코드를 sumocfg 파일에 넣으면 된다.
<gui-settings-file value="autobahn.view.xml"/>
아래는 sumocfg 파일에 위 코드를 추가한 모습
<configuration>
   <input>
       <net-file value="autobahn.net.xml"/>
       <route-files value="autobahn.rou.xml"/>
       <gui-settings-file value="autobahn.view.xml"/>
   </input>
</configuration>'SUMO Simulation' 카테고리의 다른 글
| [SUMO Study] 시뮬레이션 내 여러가지 기능 및 옵션에 대한 공부(1) (0) | 2024.04.21 |
|---|---|
| [SUMO Tutorial] 격자형 네트워크 만들고 랜덤하게 차량들을 투입시켜 시뮬레이션 수행하기(Manhattan Mobility Model) (0) | 2024.04.20 |
| [SUMO Tutorial] 차량, 버스, 보행자, 자전거, 트램까지 구현하기(with 전용차로 및 신호) (0) | 2024.04.20 |
| [SUMO Tutorial] Loop 네트워크 만들고 시뮬레이션 수행 (0) | 2024.04.20 |
| [SUMO Tutorial] 빠르게 네트워크 구축해서 Demand 입력하고 시뮬레이션까지 (1) | 2024.04.19 |


